Mad-Dud - Water heater temperature monitoring
Is there hot water? I don't know, let's build a thing.

Introduction - Why do I want to know?
“Is there hot water?” - that’s the question sometimes on my mind. Not all the time, but it’s interesting to tell. In our home, we have a giant (250 Liter) water cylinder heated by a gas boiler. I have automation for it, but it’s entirely time-based. We really don’t use that much hot water, so we only need to heat it for a short while… but that is longer in the winter. I used to adjust it twice a year, but eventually came to create a weather-based automation.
alias: "Hot Water: Daily Profile Selection"
description: Adjusts water heating based on today's forecasted low temperature.
triggers:
  - at: "05:00:00"
    trigger: time
actions:
  - data:
      type: daily
    target:
      entity_id: "{{ weather_entity }}"
    response_variable: daily_data
    action: weather.get_forecasts
  - variables:
      today_low: "{{ daily_data[weather_entity].forecast[0].templow | float(0) }}"
      target_profile: |
        {% if today_low < low_temperature %}
          LongTimer
        {% elif low_temperature <= high_temperature <= 15 %}
          MediumTimer
        {% else %}
          ShortTimer
        {% endif %}
  - if:
      - condition: template
        value_template: "{{ target_profile != previous_profile }}"
        alias: Profile should change
    then:
      - target:
          entity_id: select.hot_water_active_profile
        data:
          option: "{{ target_profile }}"
        action: select.select_option
      - action: heatmiserneo.get_device_profile_definition
        metadata: {}
        target:
          device_id: # Heatmiser device ID
        data:
          friendly_mode: true
        response_variable: profile_details
      - action: notify.parents_mobile
        data:
          title: "🚿♨️Hot Water: Switching to {{ target_profile }}"
          message: >-
            Today's low temperature is forecasted as {{ today_low }}°C.
            Adjusting water heating schedule to:


            Mon-Fri:

            {%- set monday_slots =
            profile_details['select.hot_water_active_profile']['info']['monday']
            %}

            {% for slot in monday_slots -%}

            - {{ slot.start_time }}-{{ slot.end_time }}

            {% endfor %}

            Sat-Sun:

            {%- set sunday_slots =
            profile_details['select.hot_water_active_profile']['info']['sunday']
            %}

            {% for slot in sunday_slots -%}

            - {{ slot.start_time }}-{{ slot.end_time }}

            {% endfor %}
variables:
  weather_entity: weather.openweathermap
  low_temperature: 2
  high_temperature: 15
  previous_profile: "{{ states('select.hot_water_active_profile') }}"
mode: single
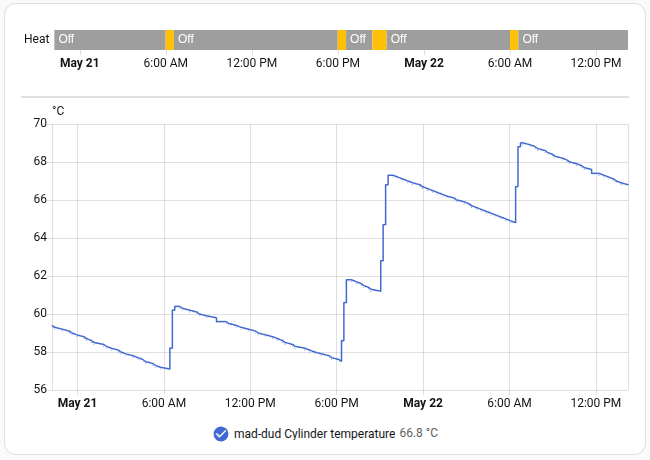
Still, I felt like I was “flying blind”. How much hot water is in the cylinder? Am I heating too much and wasting money? Am I heating too little and gradually losing heat in the cylinder? It felt strange not to be able to know, compared to the precise stats I have on the house’s air temperature.
One day we were coming back from a few days away; we set the water heating to “holiday mode”, and turned it on with a “manual boost” for a few hours before we got back. As it turned out - not for long enough. We wanted to shower right away (bit of a crisis with the kids), and the water was… lukewarm. Now I was dealing with an incident and lacking monitoring.
How to measure
When asking maker/handy friends how I would go about measuring the temperature of the water cylinder, none of the suggestions were really applicable. The cylinder doesn’t have a removable “lid” at the top; I had no intention of messing with plumbing, and definitely not sawing open an additional hole.
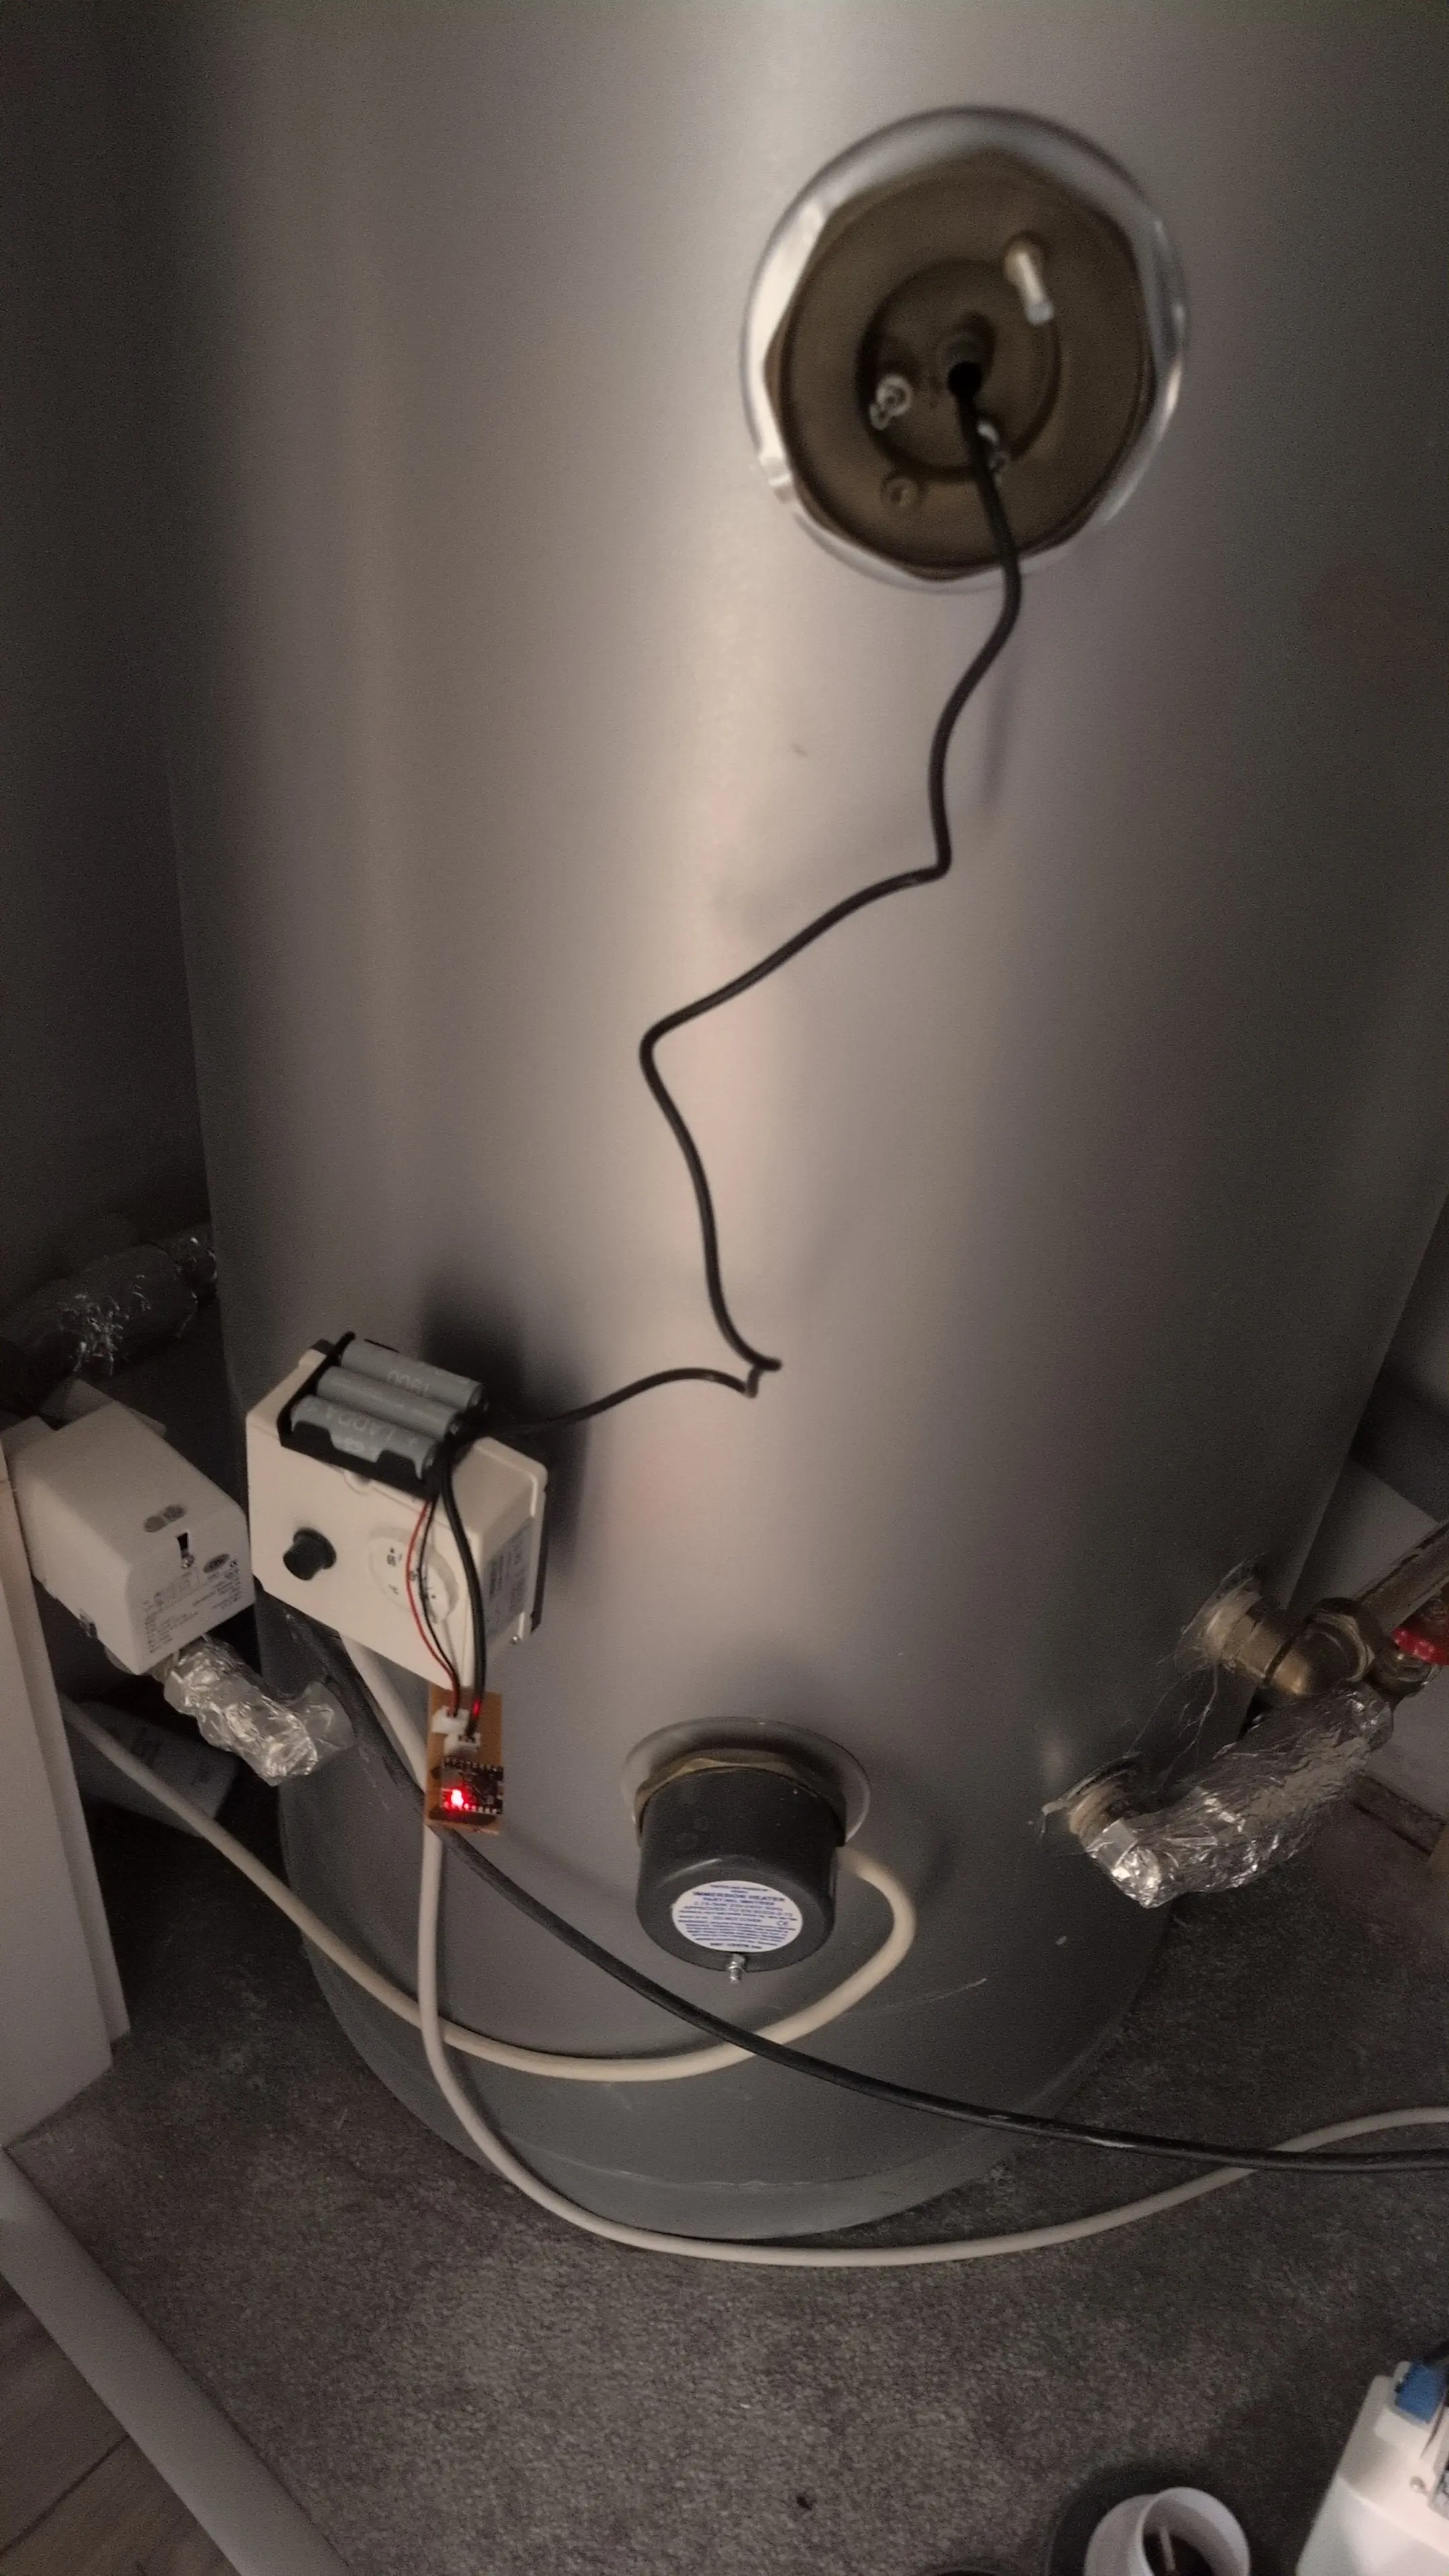
The solution came from a completely unrelated source: Technology Connections. The entire channel is simply fantastic, but a particular video about water heaters being clever had the solution. My water cylinder is usually heated by gas; it also has a secondary electrical heating element (called an “immersion heater” around here), and has support for a second electrical heating element, mounted higher up the tank. Looking at the tank, this made sense: there was one protrusion at the bottom with a cable running into it, and a second, identical protrusion further up the tank with no cables attached. So, huzzah, Mr. Connections taught me something about my house!
The way I figured it, the higher-up protrusion was likely a slot, unpopulated, but with support for introducing a secondary water heater. I also thought this slot would be “wet”; that is, if I were to try and open it, water would flow out of the cylinder, punishing me for my hubris. However, on an unrelated visit from a chatty electrician, upon discussing this same issue, he demonstrated two things:
- The slot was in fact populated with an immersion heater (which was doing nothing as it wasn’t connected to power)
- The slot is actually a “dry” one; the immersion heater isn’t really “immersed” in the water.
Removing the immersion heater (simply pulling it out) revealed that the cylinder itself “bends inwards” into a metallic finger, which houses the immersion heater. Apparently this is called a “pocket” or a “thermowell”. I figured if it’s good enough for heating the water - it’s good enough for measuring its temperature.
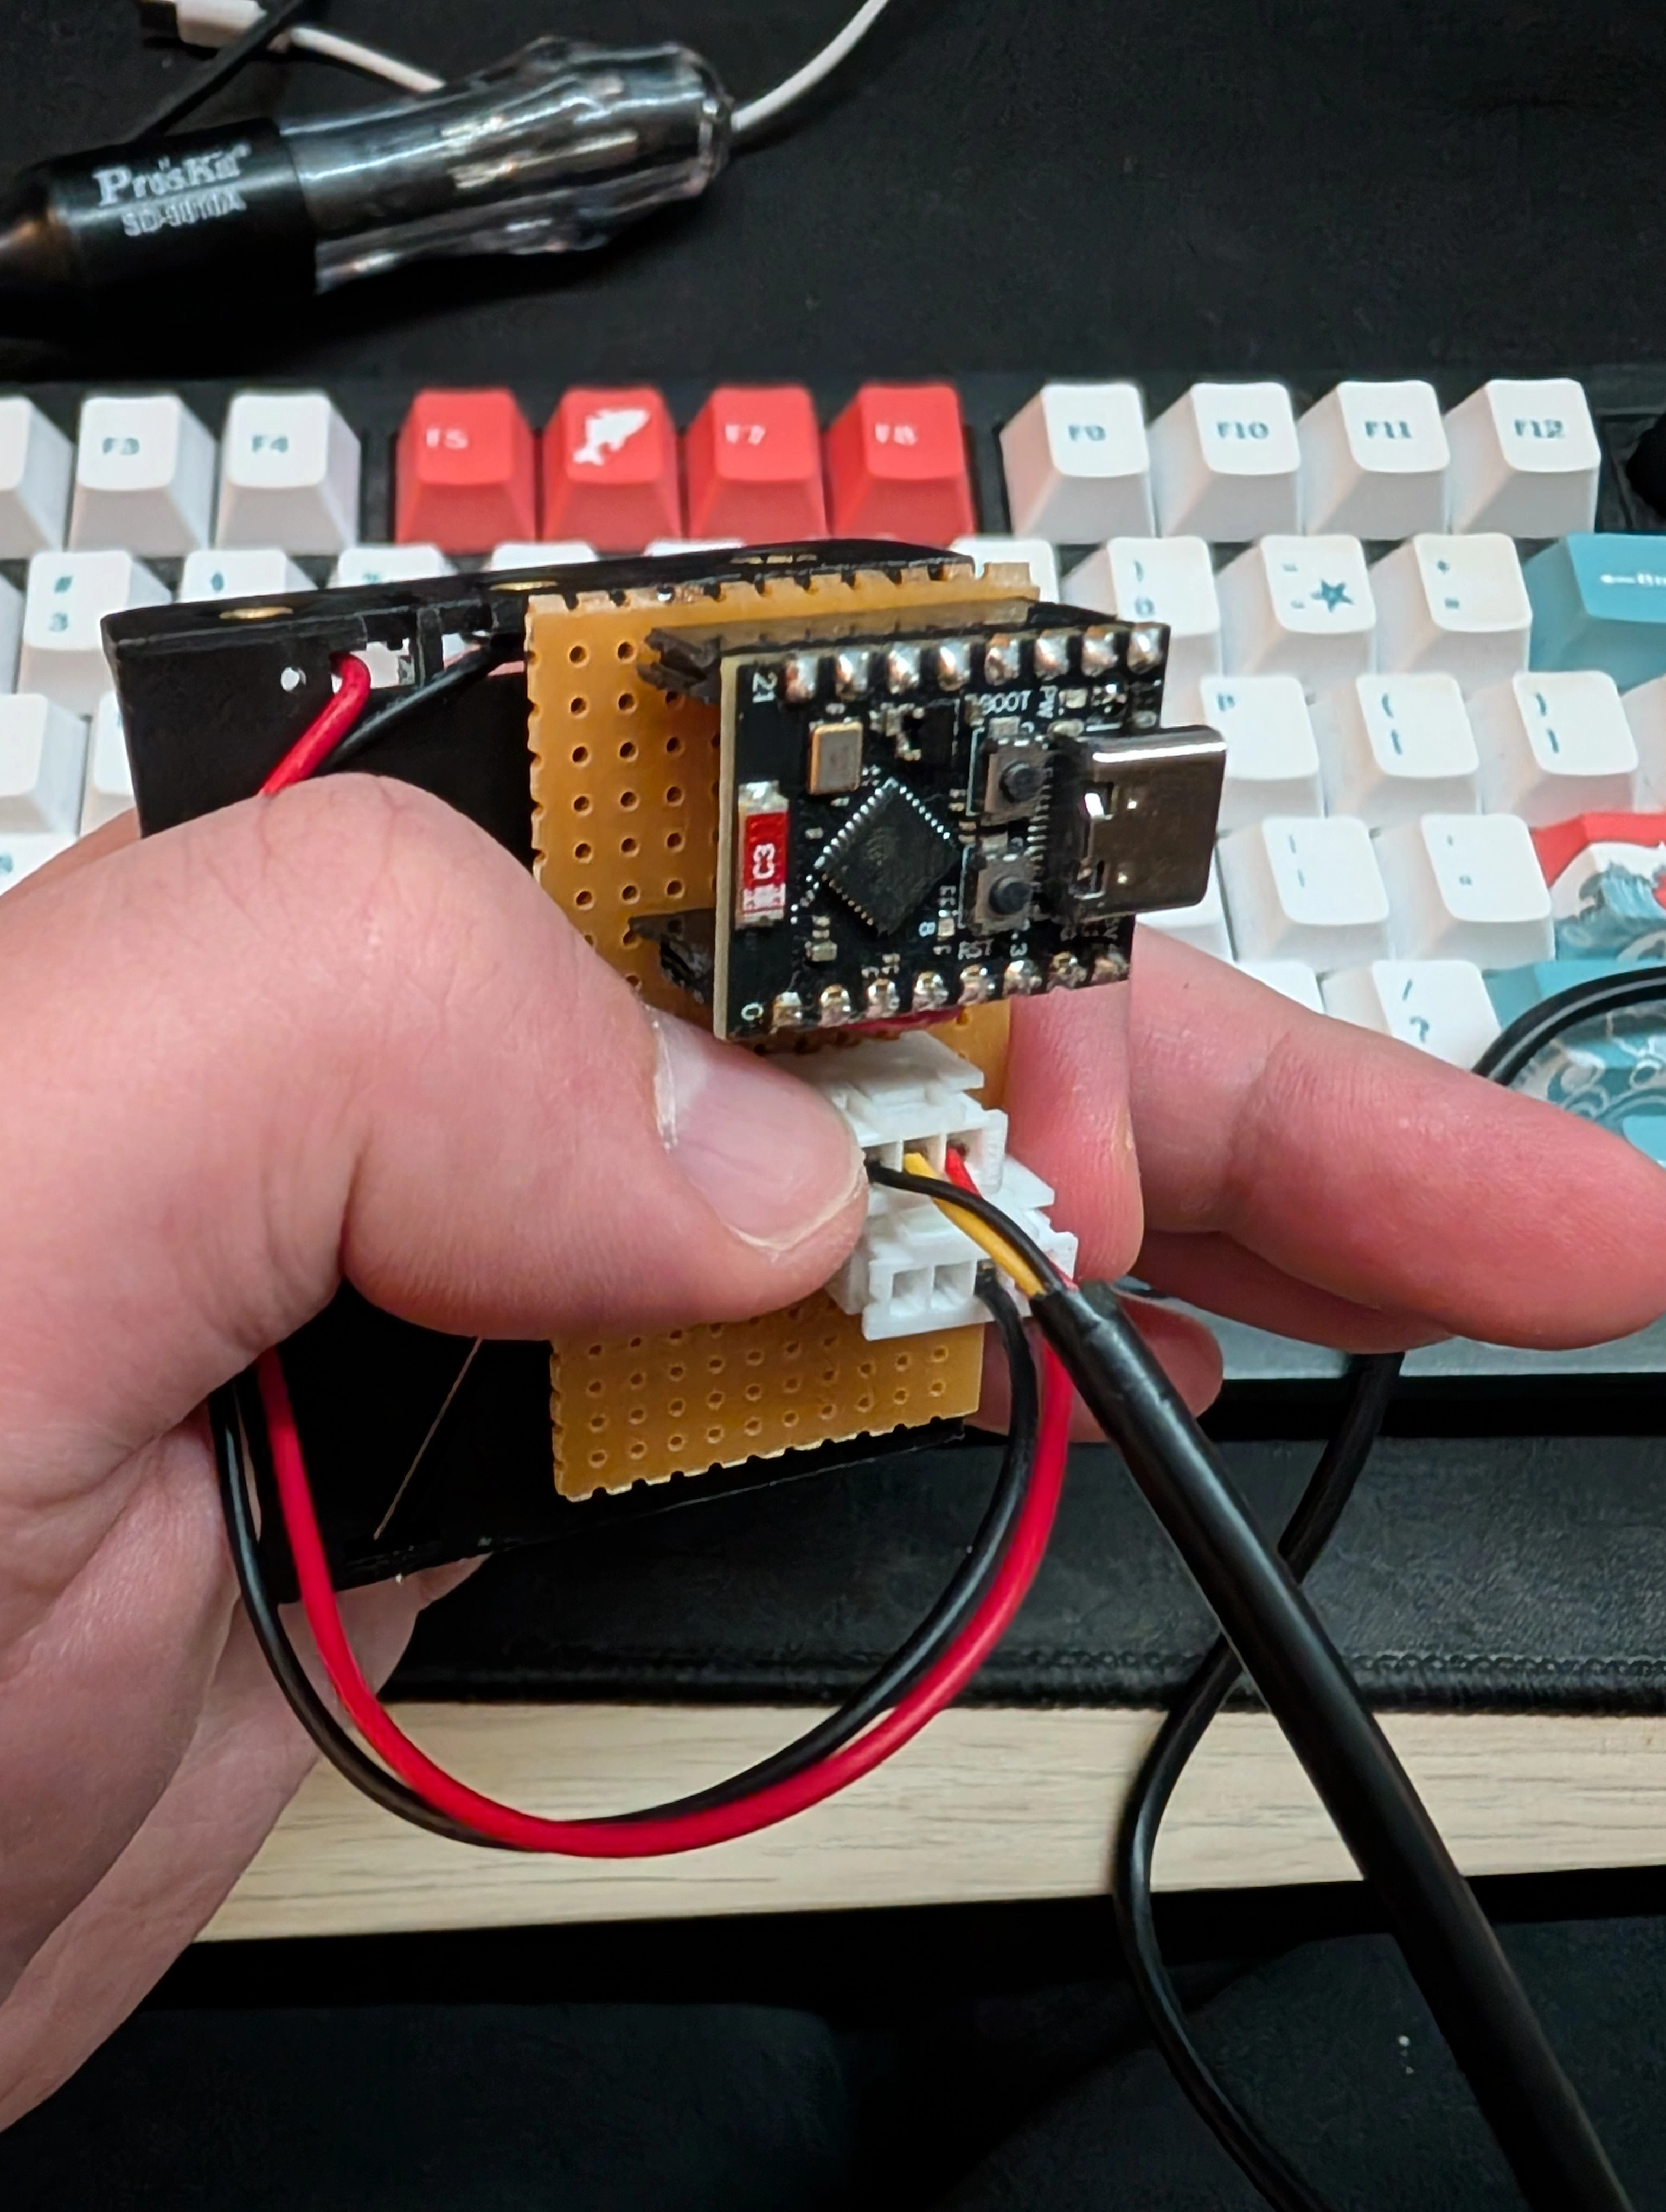
I purchased a DS18B20, which is a temperature sensor on wire. I was delighted to find out it fit perfectly in the pocket, easy to insert or extract. With a small ESP32-C3-SuperMini, a bit of breadboard, test hooks probes, dupont connectors, ESPHome, and a USB battery pack, I was finally able to get measurements of the temperature of the water in (the middle of) the cylinder.

Battery power
The next problem to tackle was power; the USB battery pack works, but isn’t intended for long-term use: There are efficiency losses, and it might just turn off if power draw is low enough (e.g. during sleep).
As it turns out, the ESP32-C3-SuperMini uses an onboard LDO called ME6211 that converts higher voltages to 3.3V, and will happily deal with input voltages up to 6V (thanks Balázs!). IKEA now sells inexpensive rechargeable AA batteries which are nominally 1.2V, so three of these will give 3.6V; I bought a plastic holder for those, tested it out, and it worked great!
With the current ESPHome configuration, the device could only last a few hours on battery power. I wanted to reduce battery usage to a reasonable level. This can be accomplished by having the device “sleep” most of the time. Then the idea is to have the device wake up for as short of a period as possible, take a measurement, report it, and go back to sleep.
This is where MQTT was surprisingly helpful, replacing HomeAssistant’s native API. With the native API, the ESP device acts as a server that HomeAssistant constantly tries to reach. Timing this is difficult when the ESP is usually asleep. While you can configure some kind of ‘awake’ signaling from the ESP back to HomeAssistant, switching to MQTT is much simpler for deep-sleep devices: The ESP simply wakes up, publishes its payload the the broker, and drops back to sleep.
substitutions:
  low_power_mode: "true"
  update_interval: "never"
  log_level: "ERROR"

esphome:
  name: mad-dud
  on_boot:
    priority: -10
    then:
      - delay: 2s
      - component.update: temp_sensor
      - if:
          condition:
            lambda: 'return ${low_power_mode};'
          then:
            - delay: 15s # Window to catch OTA updates
            - deep_sleep.enter: deep_sleep_control

esp32:
  variant: esp32c3

deep_sleep:
  id: deep_sleep_control
  sleep_duration: 10min

wifi:
  manual_ip:
    # include static IP configuration here, so we don't wait for DHCP
  fast_connect: ${low_power_mode}

logger:
  level: ${log_level}

one_wire:
  - platform: gpio
    pin: GPIO4

sensor:
  - platform: dallas_temp
    name: "Cylinder temperature"
    update_interval: ${update_interval}
    retain: true # Home Assistant visibility during sleep
    id: temp_sensor

mqtt:
  broker: !secret mqtt_broker_ip_address
  username: !secret username_mad_dud
  password: !secret api_key_mad_dud
  discovery: true
  topic_prefix: mad-dud
  birth_message:
    topic: mad-dud/birth
    payload: 'ON'
  will_message:
    topic: mad-dud/willdisable
    payload: disable


packages:
  wifi: !include packages/wifi.yaml

ota:
  platform: esphome
  password: !secret ota_password_mad_dud
In the initial testing, with debug logging, and a 2-minute interval, the batteries lasted for 8 days, with the final voltage being 2.5V. With debug logging disabled and a 10-minute interval, the batteries lasted for 43 days, which is plenty. Technically it’s possible to reduce power usage even more by de-soldering the red LED from the ESP board… but it doesn’t seem worth it.
It’s worth mentioning that because we use retain: true, there’s no built-in
way for HomeAssistant to realize the battery is dead. Fancy workarounds are
possible, but this automation seems to do the trick:
| |
Case design
The final step was to create a case for the project. I struggled a lot with this - I wanted to keep it simple, but also reasonably maintainable (that, for example, is why the ESP32 is inserted into headers rather than soldered directly). The battery holder has screw holes, which I could’ve used with my M3 heat-set threaded inserts… but they’re ever-so-slightly too small for M3 screws.
After looking at designs online, as well as remote controls I had in my house, I opted for a simpler route: using double-sided tape to mount the battery holder to the back of the perfboard, like so:
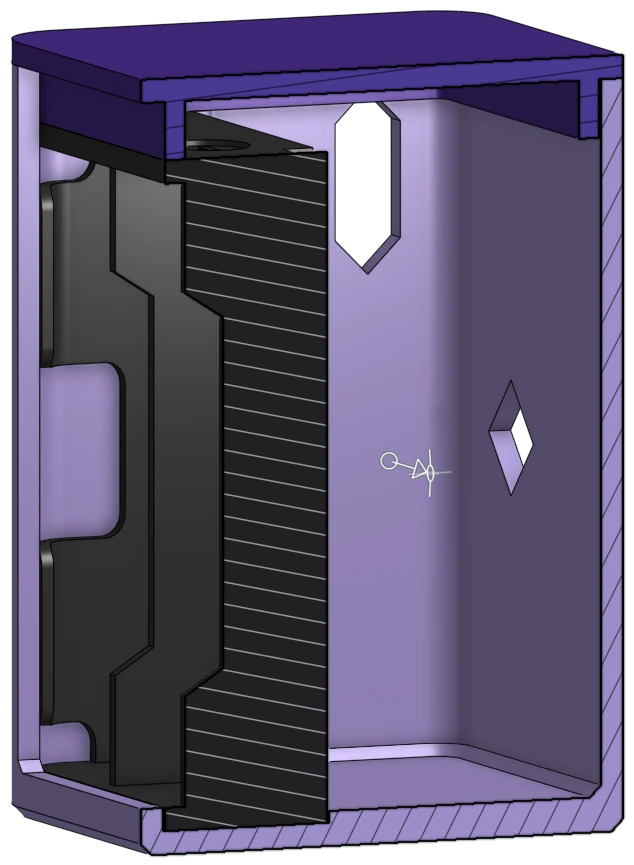
This allowed a relatively simple, screw-free design where the battery case (which has smooth edges and easy-to-define dimensions) would slide in from the top, supporting the perfboard. The thermostat wire would exit through a hole on the front. A second hole would allow for access to USB (although, realistically, alignment was hard to get right, and it’s easy enough to slide the assembly out for maintenance). The whole thing is secured by a simple ball-snap lid.
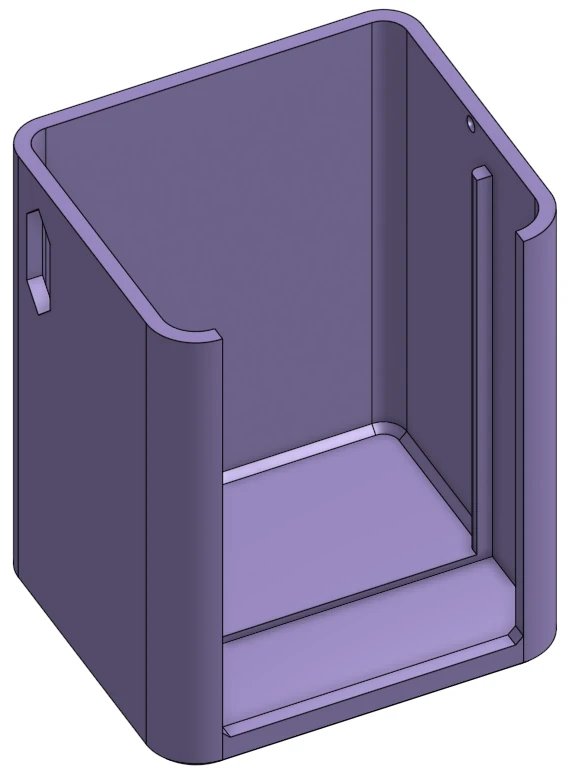
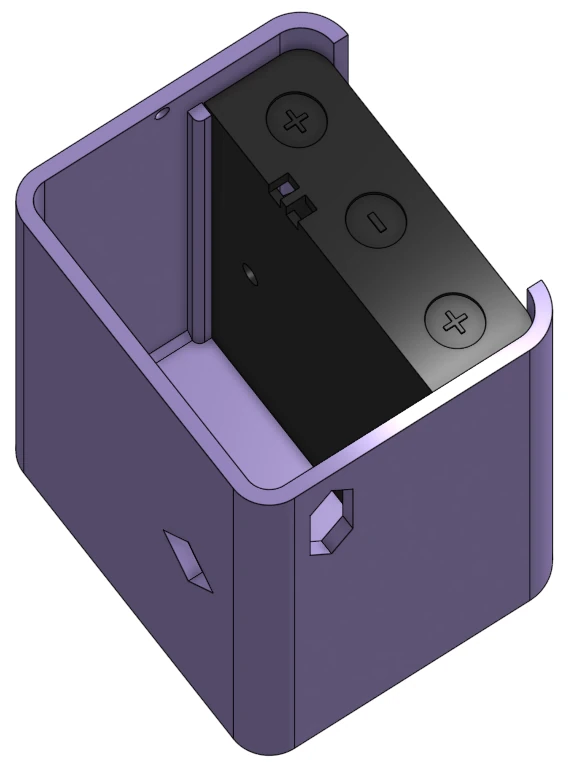
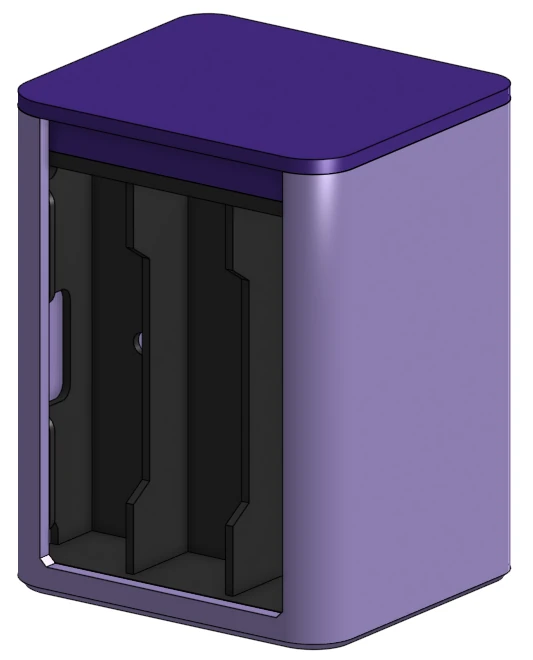
The purple color is chosen simply because I’m trying to get rid of some “Silk” PLA filament, which has worse mechanical properties than ordinary PLA. It does look nice though.
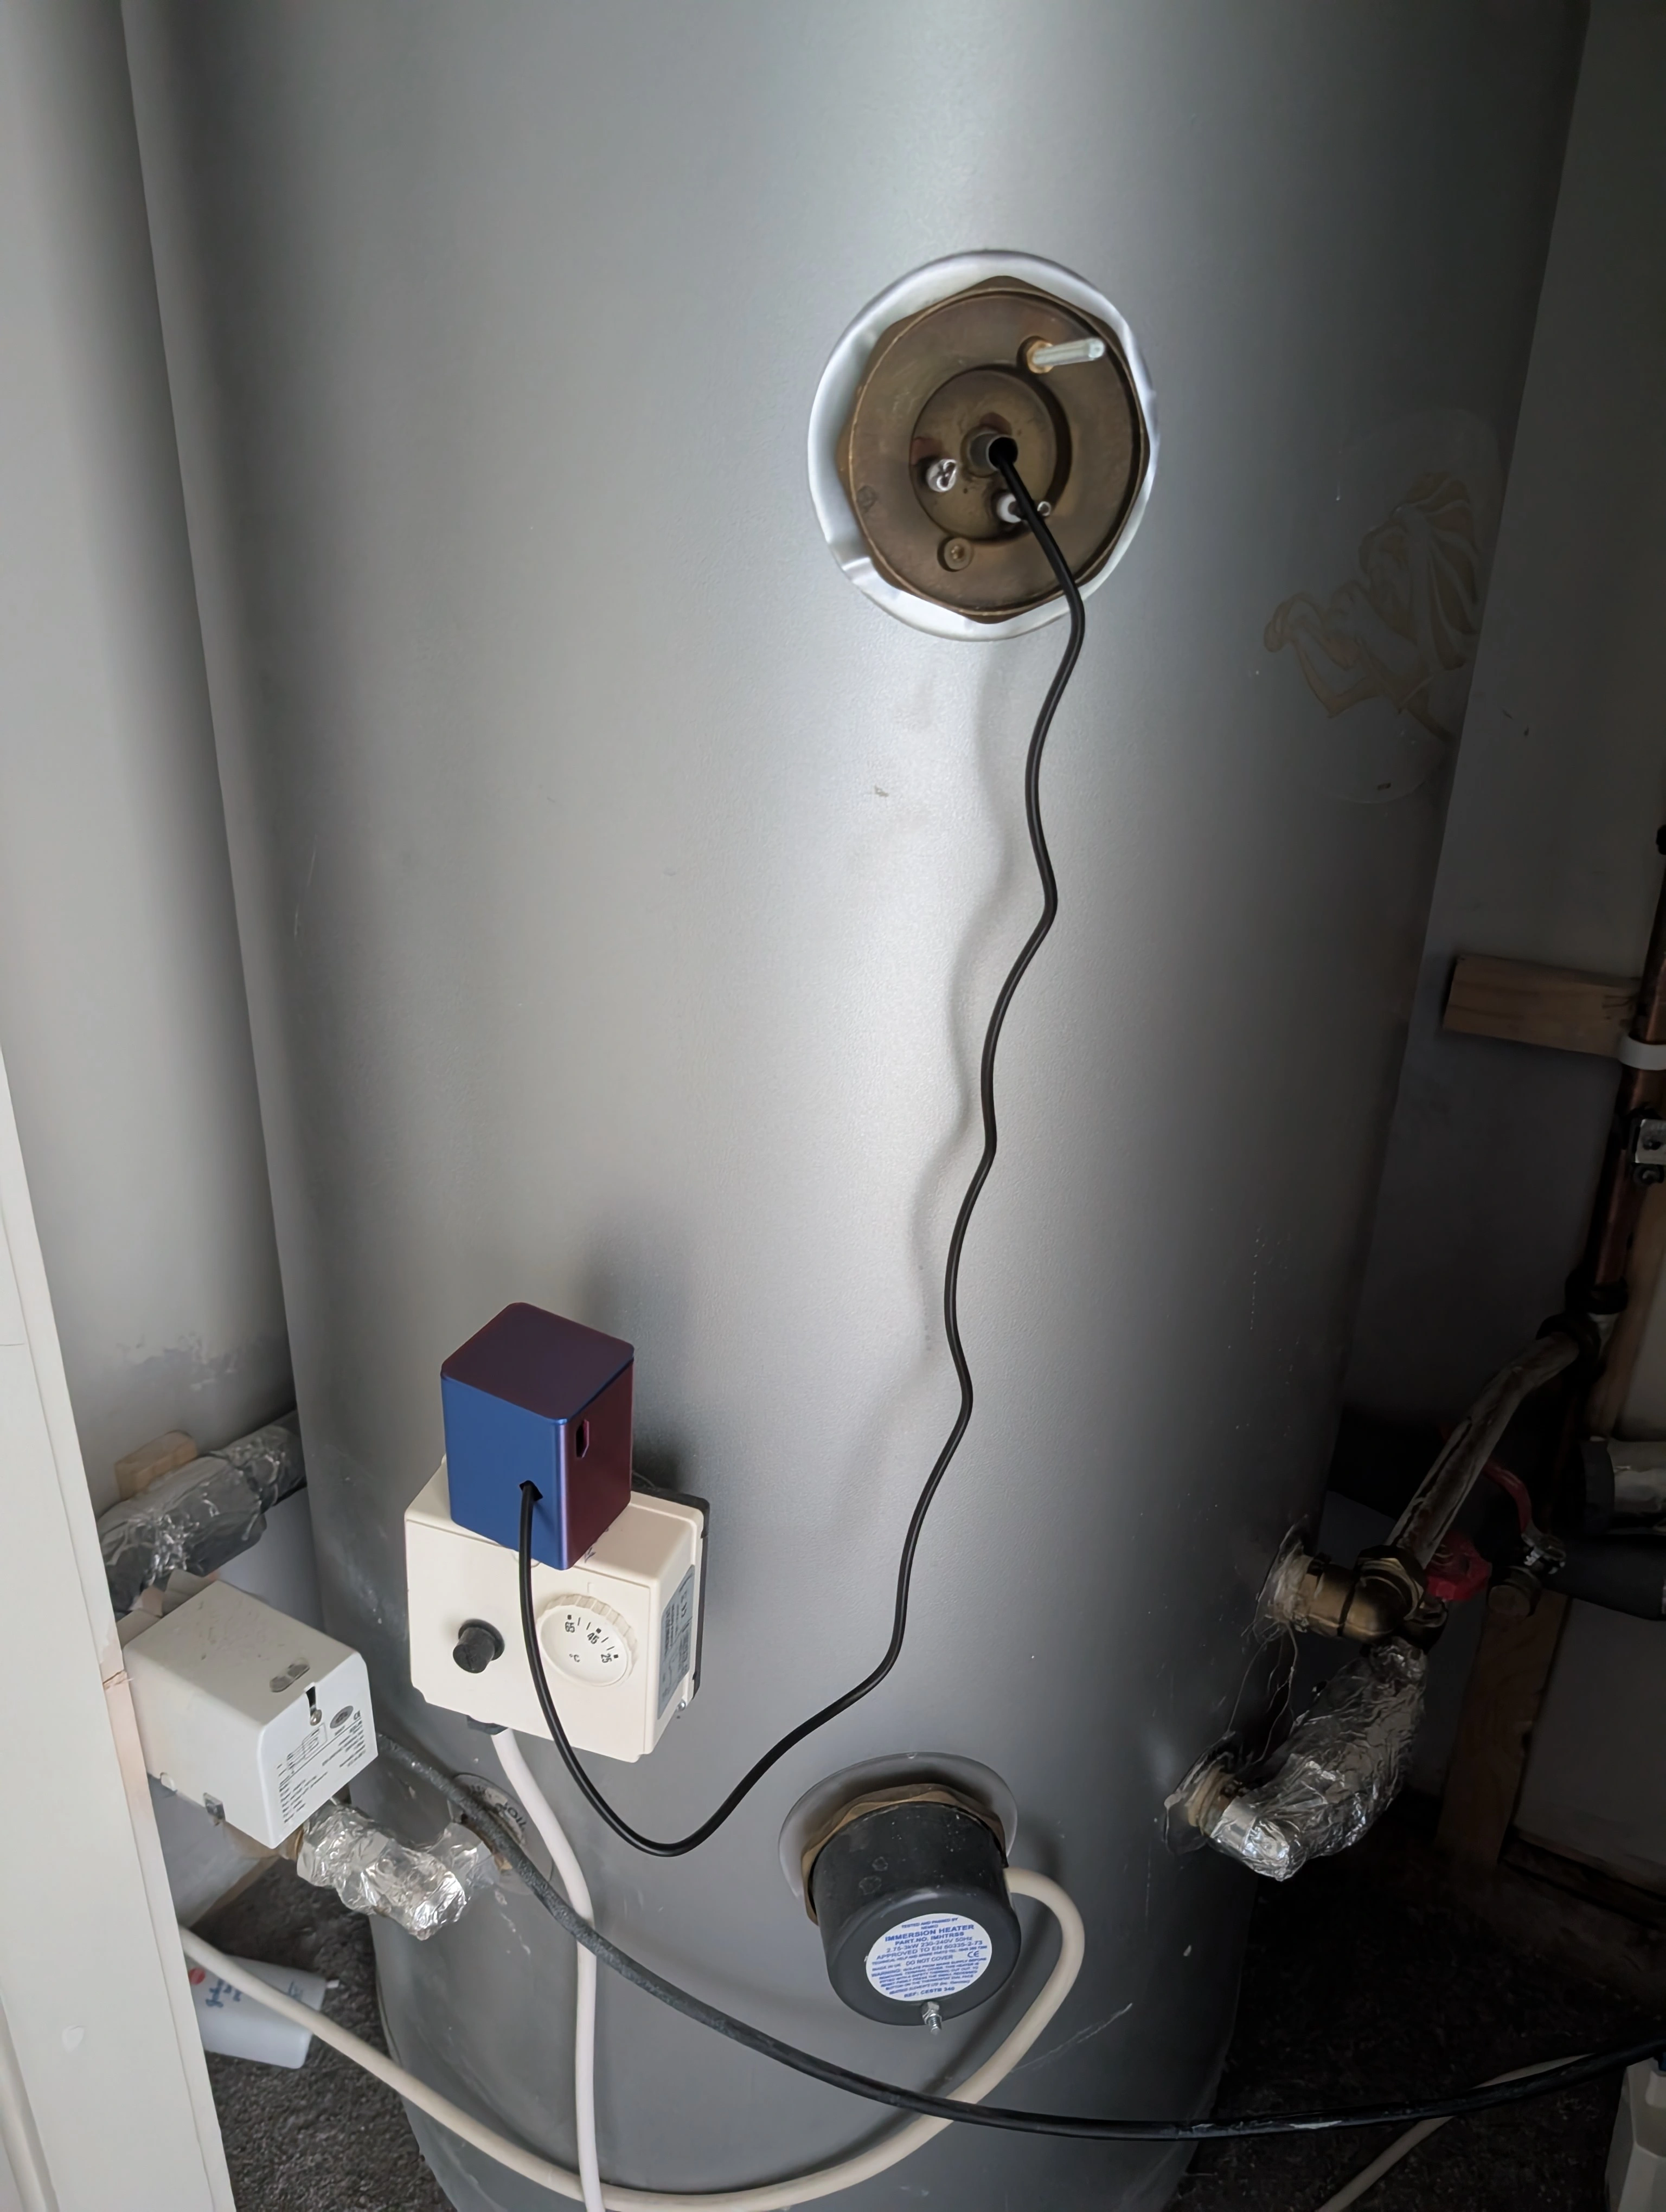
Finally, for mounting the case; the cylinder is metallic, and I have some neodymium magnets. However, with three AA batteries, the assembly became too heavy; even the slightest amount of plastic the magnets and the cylinder caused the whole thing to fall off. After lots of deliberation, I settled on a low-tech solution - just plop it on an already-attached box:
Afterword
This project was lots of fun. It scratched a monitoring itch, got me dealing with low-power micro-controller shenanigans, and had a nice 3D printing design challenge. I managed to do it all on an extremely tight budget. The best part was, as usual, the people I worked with - I got a lot of support from the maker-space community at work, who were all providing ideas and cheering me on. And I did get pretty graphs out of it, which was always the point.